It's embarrassing to admit last year's December Daily album remains unfinished. Journaling is not my strong suit and this is the only element remaining to complete. I've firmly committed to completing one page each day until finished. Four remain. Baby steps.
Another project completed (tonight, yee-haw) is indexing all the stamps. Most would still consider me a rookie, but stamping over 200 stamps by category is not child's play. Now when out shopping, I'll think twice about buying 15 sets at a time. I will not get behind again. Once they come into the house they won't be put away until they've been stamped into their corresponding page.
I bought the 4x6 Fiskars Easy Stamp Press before beginning the task.
I can no longer imagine stamping without this tool. From the beginning stamping has always been hit-or-miss, mostly miss, and as such created dread when a project included stamping This allowed me to become a pro overnight. Stamps have no choice but to comply with equally applied pressure. For the first time I can stamp a clean, crisp image every time. This rates as high as review scales go. A definite must for both beginning scrappers and pros alike.
This vacation's mini remains in the conception phase. I've selected all the photos, which go out to print tomorrow and I've committed to the size (8x8) and using the Fair Skies collection. Now to get motivated.
A place to share tips, project ideas, and inspiration for card makers & scrapbookers, anywhere and everywhere
Showing posts with label stamping. Show all posts
Saturday, July 6, 2013
Sunday, June 17, 2012
Boing, Boing, Busy
That whole stamping category process continues. The first day I knocked out about 100 stamps, since then only a few packs at a time. Slowly, but surely. This will curb my appetite for large random stamp purchases. (Boy, oh boy, what a meager set with such limited range, or so I know now going through the process!)
Today's focus was working with the Miss on a Father's Day card. Her ability grows.
I've virtually copied and completed two different types of mini albums, step-by-step. It's a long-standing threat, but it's time to break away from the masters at YouTube and develop my own style. And, in my fashion, design not one, but three, all at the same time.
Graphic 45's Playtimes Past is a charming collection. I don't mind cutting the paper any longer, but I only had a 12x12 inch pad. Not so much room for error. I found another 12x12 during one of the more recent excursions for only $7.00. Mine! Now there's back up, not so much nail biting. There's no getting around the fact that G45 fashions its lines with women in mind. They do publish more masculine lines - and do a marvelous job - but even then many of the details scream feminine. The Playtimes Past is a very fair mixture for both sexes. I want the more masculine pages used for a carefully selected collection of my boys childhood pictures. That leaves about 1/2 of the paper unused. However!! When I begin making pages for them, I can begin designing the feminine pages for my sister's girls; using the same page styles, but frilly it up a bit, more ribbon and sparkles, etc. So two MA's for the work of one. Not a bad idea.
The third will be a no-frills summer camp mini. I've selected a Tim Holtz Retro Grunge paper pad for the project. A little dark, perhaps, for a girl's summer album, but I'm sure this will fit her to a Tee. I think to pattern this after the wallet-style just completed for this coming Christmas photos, with major modifications since we're only looking at less than 25 shots.
First though, I must pull together a couple (four or five) regular 12x12 layouts. There's a very gratifying feeling when completing projects. LO's only take a day or so and therefore seems as if I'm accomplishing much more than when compiling a single mini. Perspective.
In less than 10 minutes I pulled together the first LO. Add paper and embellishments, and it's a done deal.
Our only snow 2012 |
Wednesday, June 13, 2012
Stamp Organization System
Way, way back in March I described a system that helps keep track of the all the punches I own. The system is working out wonderfully; no more guessing about ownership of a particular punch, and knowing exactly what's a hand in an instant.
Keeping an active scrapbooking room organized is the singularly most difficult part of the hobby. Too many times," out of sight, out of mind" applies and various items become under-used. This proves especially true when it comes to stamps.
I don't have a mega-collection of wood, acrylic, and rubber mounted stamps; there's probably about 200 individual stamps in all. How to best keep the inventory in mind? And because of the nature of stamps, they tend to end up in various places around the room: baskets, shelves, boxes, etc.
While trying to remember whether I had an appropriate stamp for a project being worked on today, and spending over 15 minutes looking about the room for one, I came to a breaking point. Something had to be done, and done now!
Solution: I pulled out a box of extra large index cards and begin stamping images by category. Some fell into more than one, so those were stamped in whatever other category they could be assigned.
In little over three hours I grew a index card collection about 1/2 inch thick. Unfortunately, this also meant cleaning, drying, and repackaging each stamp. I'm stopping today at the halfway point... or so I hope, though I'm still working on repackaging/drying the first batch.
Just as in the case of the punch system, stamps will on longer come into the house without assigning a category with the stamped image. I've yet to determine the binding system since the collection will continue to grow over the months and years to follow, but notebook closure rings or ribbons come quickly to mind.
___________________________________________________
It's really a "nothing" deal, but I've been asked to come in and work with a group to teach the basics of card making. I'm flattered to no end. It will be enough to know I've helped people of all ages discover a new creative outlet.
Keeping an active scrapbooking room organized is the singularly most difficult part of the hobby. Too many times," out of sight, out of mind" applies and various items become under-used. This proves especially true when it comes to stamps.
I don't have a mega-collection of wood, acrylic, and rubber mounted stamps; there's probably about 200 individual stamps in all. How to best keep the inventory in mind? And because of the nature of stamps, they tend to end up in various places around the room: baskets, shelves, boxes, etc.
While trying to remember whether I had an appropriate stamp for a project being worked on today, and spending over 15 minutes looking about the room for one, I came to a breaking point. Something had to be done, and done now!
Solution: I pulled out a box of extra large index cards and begin stamping images by category. Some fell into more than one, so those were stamped in whatever other category they could be assigned.
Indexed Images |
In little over three hours I grew a index card collection about 1/2 inch thick. Unfortunately, this also meant cleaning, drying, and repackaging each stamp. I'm stopping today at the halfway point... or so I hope, though I'm still working on repackaging/drying the first batch.
What a mess I created! |
Just as in the case of the punch system, stamps will on longer come into the house without assigning a category with the stamped image. I've yet to determine the binding system since the collection will continue to grow over the months and years to follow, but notebook closure rings or ribbons come quickly to mind.
___________________________________________________
It's really a "nothing" deal, but I've been asked to come in and work with a group to teach the basics of card making. I'm flattered to no end. It will be enough to know I've helped people of all ages discover a new creative outlet.
Tuesday, January 24, 2012
Sharpies & Photos
Altering photographs is scarey business.
I attempt to decorate photos only on prints that can easily be taken to the local photo shop and have them printed again. Never, never, never on original prints dating back years.
Today I played with a print recently back from Walgreen's and decided to use one of the journaling templates bought, but rarely used. The template is plastic if that makes any difference at all. For the colouring medium, I decided on a Sharpie Marker. (Sharpie has such a great range of colour you would never expect, usually found in the art department of a craft store.)
Not the greatest idea I've come up with! The ink sets on top of the print and the moment the template moved the ink dragged with it. Fortunately, I was able to save the print because the ink sets on top of the print instead of quickly absorbing into the photograph paper. This is a mixed blessing.
I would have been much better off using a regular ink pen. Yes, I know: standard ink is bad for photos. Bad. And so, my first attempt of decorating photos with ink was a partial failure. Live and learn, right?
________________________________________
The Peach Keen Stamp set arrived in the mail today. My first project using these stamp will surely involve anthropomorphizing a soccer ball, since the next scrapbook page involves documenting this winter's Futsol games. It's safe to say there will be many uses for the stamps throughout the hobby. Now I'm dancing around waiting for next month to buy the animal faces. I did decide that eventually the monster faces are a must.
________________________________________
Getting down the right photography skills is a process and world into it's own.
Another projects finished in the past week:
Feeling A Little Snooty, Page 2
Friday, January 20, 2012
Peach Keey Stamps
I've wanted a Peachy Keen Stamps stamp set for months now. Today (ta-da) I purchased my first set. (Now to wait forever to them get to the house.) This site has to be the best collection of face stamps available.
I ordered the original set, which is a good start. I also bought an acid/lignum-free white pen to colour in the eyes.
But, oh, how much more they've put out; human, animal, Halloween and many more faces in every size and expression imaginable. They've even come out with die sets with two different face stamps per die... and they are adorable!
I can only imagine it would take a small fortune to own all their products. I'll have to be very selective with my inventory. I think I'll stop at the assorted face stamp set and one assorted animal face set. Or more. It depends on my mood. (I did put a set of acrylic block set with the rounded grips in my wish list for next month's order. All are currently 90 degree edges.) They even have stamp sets that coordinate with various Cricut cartridges. Along those lines, MyPinkStamper.com has designed word stamp sets that compliment Cricut cartridges, but I've yet to buy from there, either. To own fully integrated Cricut cartridge, word and face stamps is a dream come true.
When I receive my next allowance payout I am 100%-positive-sure buying a border template set from Kiwi Lanes.
________________________________________
Over the past several days I've filled my time by finishing scrapbook pages and have created a few more. There's no feeling like putting a page in the scrapbook knowing there's no more work to be done.Here is one of the latest pages:
Now that I'm getting the hang of photographing the 12x12 pages I'm sure to post more!
*** Whoopie: My new Spellbinders Edgeability set arrived in the mail today. :D
I ordered the original set, which is a good start. I also bought an acid/lignum-free white pen to colour in the eyes.
I can only imagine it would take a small fortune to own all their products. I'll have to be very selective with my inventory. I think I'll stop at the assorted face stamp set and one assorted animal face set. Or more. It depends on my mood. (I did put a set of acrylic block set with the rounded grips in my wish list for next month's order. All are currently 90 degree edges.) They even have stamp sets that coordinate with various Cricut cartridges. Along those lines, MyPinkStamper.com has designed word stamp sets that compliment Cricut cartridges, but I've yet to buy from there, either. To own fully integrated Cricut cartridge, word and face stamps is a dream come true.
When I receive my next allowance payout I am 100%-positive-sure buying a border template set from Kiwi Lanes.
________________________________________
Over the past several days I've filled my time by finishing scrapbook pages and have created a few more. There's no feeling like putting a page in the scrapbook knowing there's no more work to be done.Here is one of the latest pages:
Now that I'm getting the hang of photographing the 12x12 pages I'm sure to post more!
*** Whoopie: My new Spellbinders Edgeability set arrived in the mail today. :D
Saturday, January 7, 2012
Stamping Lessons: Hard Won
Going into design mode. Not a bad time to do this as I've yet to attract followers. Please pardon the mess.
Stamping and scrapbooking. Difficult to separate the two.
I've learned over the past year there are many styles of stamps, and many types of inks. There doesn't seem to be a locale that supplies comprehensive orientation to stamping... and this blog will not become the exception. I can, however, offer tips as experience provides.
The easiest type of stamp to work with are very simple lined, wood-mounted blocks. ( A bonus is finding a stamp with a pre-coloured picture on the back side. This comes in handy for people without formal art training or an innate sense of artist flourish in shading when colouring in the stamped image.) I quickly advanced to clear acrylic stamps, which are a pleasure to work with, as well. The foam-back cling stamp presents a few challenges to the beginner, but certainly worth adding to a stamp collection. The most difficult stamps to work with are stamps of any type with great detail, or those covering a very large area.
I bought a beautiful stamp last year featuring the Three Wise Men, created by Stampendous, measuring 4 x 5.25 inches:
As easily seen, there's a great deal of detail to the stamp. The problem encountered in earlier stamping was getting a consistent image. No amount of careful pressing around the stamp offered a finely detailed image. Finally, I picked up a book and ran it across the stamp. It worked like a charm. Martin, my ever-suffering husband, improved on the idea by using a rolling pin. We were knocking four stamped images out every couple of minutes.
Along those lines, it also took some experimenting to discover not all acrylic blocks are equal when using the clear cling-on acrylic stamps. I initially bought a large block thinking of the range of sizes this would be useful for without investing a great deal of money on the front side. That's a beginner's mentality. I ended with a very wobbly, unstable base to manage smaller stamps. Since then I've added several different size blocks and produce crystal clear stamped images about 98% of time. (One should not attempt stamping when feeling shaky or around children bouncing off your body!)
Finally, I'm not adverse to writing notes/comments on the wooden blocks. It may be another four years before a stamp is picked back up and these notes will come in handy should a tip be forgotten. My collections includes statements such as: "very clear/easy," "use rolling pin," "lightly ink," and et cetera. Even should I decide to sell them in the future, the buyer may appreciate the notation.
I see too many people not incorporate stamping into scrapbooking/card making because of initial failures. Stamping adds so much variety to pages to discard this image creation form out of hand.
So ink it up!
Stamping and scrapbooking. Difficult to separate the two.
I've learned over the past year there are many styles of stamps, and many types of inks. There doesn't seem to be a locale that supplies comprehensive orientation to stamping... and this blog will not become the exception. I can, however, offer tips as experience provides.
The easiest type of stamp to work with are very simple lined, wood-mounted blocks. ( A bonus is finding a stamp with a pre-coloured picture on the back side. This comes in handy for people without formal art training or an innate sense of artist flourish in shading when colouring in the stamped image.) I quickly advanced to clear acrylic stamps, which are a pleasure to work with, as well. The foam-back cling stamp presents a few challenges to the beginner, but certainly worth adding to a stamp collection. The most difficult stamps to work with are stamps of any type with great detail, or those covering a very large area.
I bought a beautiful stamp last year featuring the Three Wise Men, created by Stampendous, measuring 4 x 5.25 inches:
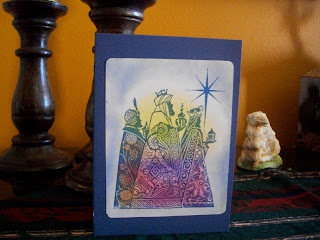
2011 Family Christmas Cards Mailed (1 of 3) |
Along those lines, it also took some experimenting to discover not all acrylic blocks are equal when using the clear cling-on acrylic stamps. I initially bought a large block thinking of the range of sizes this would be useful for without investing a great deal of money on the front side. That's a beginner's mentality. I ended with a very wobbly, unstable base to manage smaller stamps. Since then I've added several different size blocks and produce crystal clear stamped images about 98% of time. (One should not attempt stamping when feeling shaky or around children bouncing off your body!)
Finally, I'm not adverse to writing notes/comments on the wooden blocks. It may be another four years before a stamp is picked back up and these notes will come in handy should a tip be forgotten. My collections includes statements such as: "very clear/easy," "use rolling pin," "lightly ink," and et cetera. Even should I decide to sell them in the future, the buyer may appreciate the notation.
I see too many people not incorporate stamping into scrapbooking/card making because of initial failures. Stamping adds so much variety to pages to discard this image creation form out of hand.
So ink it up!
Subscribe to:
Posts (Atom)